Making a wire coil quickly using a wire as the mandrel.

Making a wire coil quickly using a wire as the mandrel.... ON THE CHEAP.
If you are like me you have probably been making your coils by hand - wrapping one wire around another. After a day, your hands become stiff and tired. I would like to keep using my hands for a long time, so I started to look for new methods.
The first thing I came across was the coiling gizmo deluxe. It's $200 and quite large. I then browsed the other coiling gizmo products, but they didn't do what I needed them to do. I wanted a wire to be the mandrel - the "rod" another wire is wrapped around. In these kits you use an actual rod/mandrel to wrap the wire around. (hang in there with me)
All this research and price tags got me thinking about ways to make a coil using a plain old drill. I am sure I am not the first person to make this discovery but there isn't a lot of information out there on how to do this.
For this particular project I used 12" of 24 gauge wire and 10" of 26 gauge wire.
The 26 gauge wire will be used to wrap around the 24 gauge wire. (All half hard - dead soft gets too squirly)

Next grab a regular old drill - I had one in my garage. Place it on a hard surface.
Open the chuck a little bit - enough to insert your wires.
Ins
 ert the larger/thicker gauge wire (24g) about two inches into the dead center. Close the chuck a little bit. Then put the smaller/finer gauge wire (26g) in one of the 3 prongs. I usually choose the one furthest from where I am sitting. Close the chuck as much as you can.
Next, I manually wrap the finer wire around the thicker mandrel wire a few times to get the coil started. Wrap toward yourself.

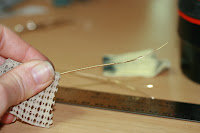
Next, start the power on the drill very slowly. I find holding my fingers as shown in
 the pictures stabilizes the wire the best. (no, I do not have glamours nails, sorry) You want the wire to wrap as closely as possible - a straight up and down position works best. You will need to practice to get the feel.
If you screw it up. Just unwrap it manually and re-wrap it as best as you can.

Here is what a finished coil looks like.

I prefer my coils to have tails on each end.
Interested in what I use my coils for?
Here are some samples of how I use them. First here is THE MINI in Saffron, hoop earrings with a briolette in the middle.
Necklaces with coiled pendants - this version has chalcedony in the middle.
Another version of a coiled pendant.
If you have any question, I welcome them here.


Comments
Post a Comment